


A few days ago I came across an unexpected example of toolmarks in a piece of oak, so having taken a snapshot it has prompted me to collect a few other examples and post them together for comparison.
There’s nothing scientific about this little collection of photos. I chose them because of the way they contrast one another. Unlike the fascinating sense from seeming chaos that Maisie Taylor was working on, analysing marks left by Bronze Age axes on thousands of preserved timbers at Flag Fen (Peterborough, UK), my pictures should suggest some of the variety to be found in edged tools – sharp cutting tools, usually made of metal these days.
So here’s the first:

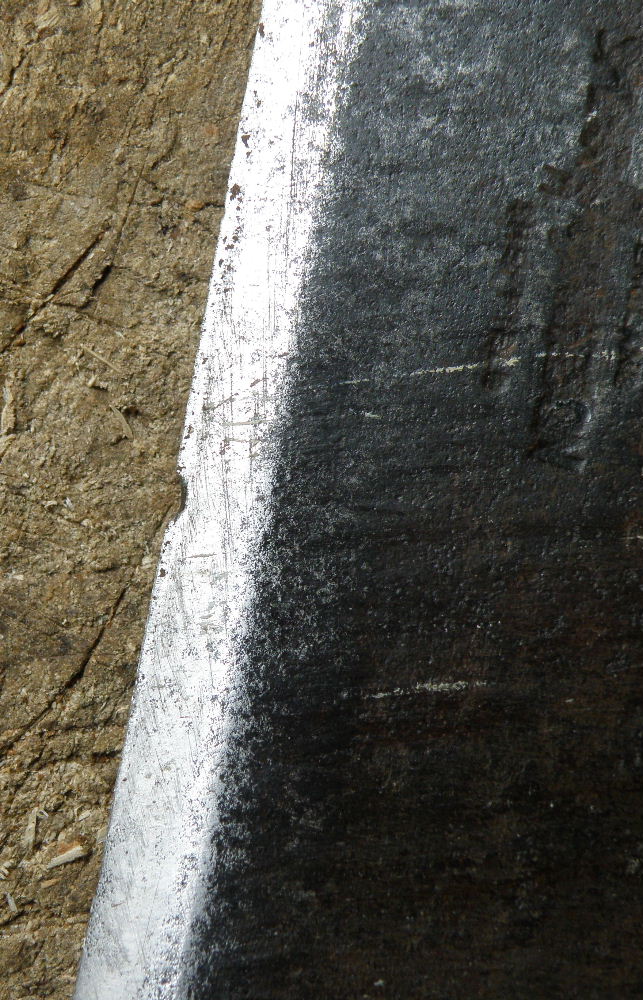
Oak lintel above the door of 35 High Street, Royal Wootton Bassett
This is a snapshot of the private access door for the residence and shop-rear at 35 High Street, Royal Wootton Bassett. The rich colour of the bricks offsets the pale, shabbily-elegant paintwork, just as the fine fanlight contrasts with the well-weathered oak lintel above (I’m not sure what’s underneath that more recent, dark wooden batton which has been screwed on above the fanlight – probably bricks). The rough surface and shaped cutaway in the lintel caught my eye as I walked past. It looks like there had once been a porch roof over this door, with a decorative moulding perhaps which had to be accommodated against the lintel – hence that curved rebate cut in the wood on the left-hand side.
There are at least two different toolmarks on the lintel’s roughened surface. On the left-hand side, inside the curved rebate, there is a group of very straight, square cuts. They do not, however, slice all the way through the wood fibres to remove chips from the lintel’s surface. Instead, the person making the cuts stopped the tool before it sliced all the way through; leaving wood fibres lifted from, but still attached to, the lintel.
The tool used to make these cuts must have had a straight, square edge. It could have been an adze or large firmer chisel. By contrast, the second set of cuts covering the rest of the lintel were I think made with a large axe. The surface has been roughened by cutting long chips out of the oak, striking the surface twice each time to remove pieces which would have been characteristically triangular in cross-section.
Axes can also be used to make really smooth surfaces. Here’s one way. Marks left by axing chips from the end of this billet are themselves removed by using the axe to shave off wafer-thin slivers of wood:


Here’s another technique, being used to thin a strake in the Roskilde shipyard. A strake is a plank for a clinker-built boat. First, a small axe with a curved cutting edge is used to cut along the length of the timber. Each cut is perpendicular to the length of the strake, cutting through wood fibres but not removing chips. Secondly, a broad axe is used, cutting from the top of the board downwards, to remove large, thin pieces of wood; these are more like shavings, which you can see carpeting the ground.


These two techniques leave characteristic waste material, but less (if any) evidence of tool marks on the wood that has been cut. By contrast, the planks used for the walls of the Trelleborg longhouse are covered in shallow, broad facets (almost the size of my hand) left by the tool – probably a wide, near-straight adze – used to finish each surface. These are difficult to see, in the shade under the roof, without a raking light.

The external surface of the hall wall, Trelleborg.
The facets look a little like flake scars on a piece of knapped flint. Knapping is a reductive process: flakes are removed from the parent stone to make a tool; they can’t be stuck back on; and the more that are taken off, the smaller the object becomes. The scars are caused by the fracture of stone which has been hit at one point, the shock waves passing through the stone and forcing a flake away. Carving is also a reductive process, but the scars – the facets left on the wood – are formed in their entirety by the sharp tool edge slicing through the wood fibres.
Interpreting the hammer types used to knap flint is possible by studying the nature of the waste flakes and the scars left on a flint tool (see for example Butler 2005, 2011:37-42). Theoretical foundations and a range of methods have been developed for that type of study (Andrefsky 1998, 2005). The huge variety in edged tools presents different analytical problems for woodwork. Take this pair of photos:


On the left, the facets on this piece of elder are thin, flat and straight. They could have been left by any number of different tools, ranging from a tiny knife with a blade no more than 2cm (¾ inch) long to a drawknife – of which there are many different types and styles. Not only that, but more than one tool type could have been used during the shaping.
This was almost certainly the case for the bowl in the photo on the right. The whole of the interior is covered in long, narrow, concave facets left by curved tools. Some of the cuts near the handles finish with snapped fibres, not a clean cut (a bit like a hinge or step fracture in flint knapping). This suggests that a small adze with with a tightly curved edge was used to remove these chips. A bowl interior doesn’t have much room to work in. Sometimes it isn’t possible to slice cleanly with the adze all the way through the wood to remove a whole chip. Instead, the chips snap out. This is more likely to happen, the steeper the sides of the bowl.
The facets inside the long sides of the bowl, however, are all clean cuts – despite being the steepest and most awkward part of the bowl to carve. This suggests that a narrow chisel with a shallow sweep was used. The small adze is moved with a hammer-like action against the bowl interior, whilst the chisel is pushed from the top of the bowl towards the bottom. This means that it is possible to slice through the wood fibres and finish before either snapping a chip out or hitting the bottom of the bowl.
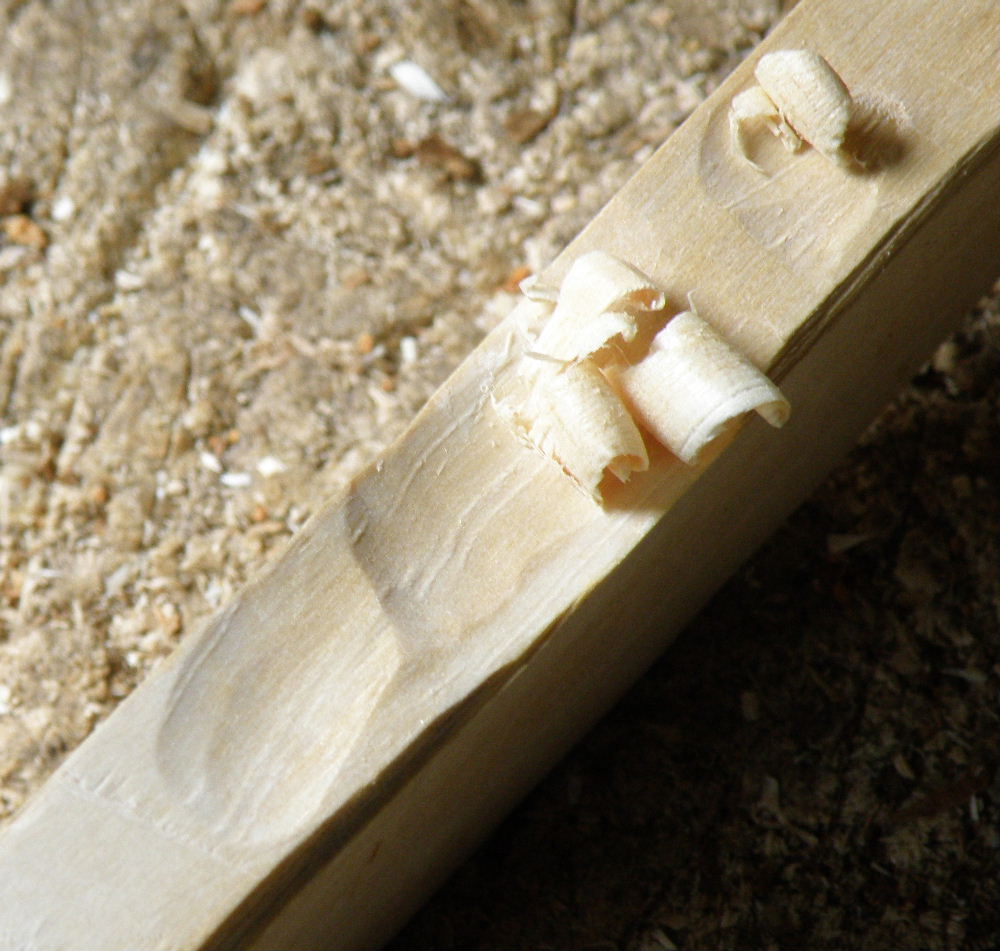
Finally, here is a set of images to illustrate a range of toolmarks and wood chips all taken from one piece of wood, following its reduction sequence:
![[1] a piece of ash.](https://artefactual.co.uk/wp-content/uploads/2014/04/ash-billet-201404_01.jpg?w=150)
![[2] the first cuts along an edge, cutting the fibres so that chips can then be removed using a long, slicing action from top to bottom.](https://artefactual.co.uk/wp-content/uploads/2014/04/ash-billet-201404_02.jpg?w=112)
![[3] the ash billet and chips removed from all four edges.](https://artefactual.co.uk/wp-content/uploads/2014/04/ash-billet-201404_07.jpg?w=97)
![[4] each edge is left with two types of toolmark: the first is the remains of the bottom of cuts made in [2], cutting into the wood and through the fibres; the second is left by the longer, slicing cuts running parallel with the billet.](https://artefactual.co.uk/wp-content/uploads/2014/04/ash-billet-201404_06.jpg?w=150)
![[5] mostly the long, slicing cuts down the edges finish cleanly, but sometimes the wood fibres at the end of the billet tear-out before the cut can slice all the way. This leaves a characteristic difference between the smooth, cut surface and the rough, torn surface.](https://artefactual.co.uk/wp-content/uploads/2014/04/ash-billet-201404_08.jpg?w=150)
![[6] an axe can be used to shave (lower, curled wood chip) as well as to cut (upper, sliced wood chip).](https://artefactual.co.uk/wp-content/uploads/2014/04/ash-billet-201404_09.jpg?w=150)
![[7] shaving the billet with the axe starts to remove the angled edges.](https://artefactual.co.uk/wp-content/uploads/2014/04/ash-billet-201404_10.jpg?w=92)
![[8] but the billet won't really become rounded until it is further shaped with a drawknife.](https://artefactual.co.uk/wp-content/uploads/2014/04/ash-billet-201404_11.jpg?w=144)

![[10] even though the drawknife is broad and wide, it is an effective tool to remove the worst of the billet's angular edges.](https://artefactual.co.uk/wp-content/uploads/2014/04/ash-billet-201404_12.jpg?w=83)
![[11] but it's not until the billet is turned that it becomes truly rounded. The toolmarks now are all perpendicular to the length of the billet, as it is cut with a chisel using the rotary motion of a pole lathe.](https://artefactual.co.uk/wp-content/uploads/2014/04/ash-billet-201404_14.jpg?w=150)
Andrefsky, W. (1998, 2005) Lithics: Macroscopic approaches to analysis Cambridge: Cambridge University Press
Butler, C. (2005, 2011) Prehistoric Flintwork Stroud: The History Press
First things first – this post will not tell you how to sharpen your tools.
The best advice I can give you – without showing you – about how to sharpen your (steel) tools is (a) read Sainsbury, J. (1984) Sharpening and Care of Woodworking Tools and Equipment Burgess Hill: Guild of Master Craftsmen Publications Ltd. The chapter on hand-tools is very useful, and the book has some great advice on grinding and sharpening equipment suitable for different types of workshop.
Then (b) take care over the quality of the materials that your tools are made of; poor quality materials won’t take and keep much of an edge. And finally (c) learn through practice what it feels like to work with your edged tools, how they behave in different materials so you know what’s going on at the edge, and check your edges all the time.
So, back to how to keep them sharp. I invest time in sharpening my edged tools. The majority are steel (the rest bronze and flint), with a relatively high carbon content that among other things helps me to sharpen them by hand.
Most of my steel tools jumble around in a tool-bag, or when in use can be found lying around on my various chopping blocks or on the end of the shave-horse – recipe for disaster should anything fall to the floor! Which is the main reason why I keep a thick layer of all the wood-shavings and chippings in the workshop.
But what about their storage and transport? Most of the steel tools are odd shapes and sizes and whilst some came with sheaths, others have no protection. Here is a selection of photos to demonstrate my solutions for keeping my tools sharp. It’s easy to spot the home-made sheaths.


Nevertheless, imperfections in the cutting edges of tools can be revealing. Maybe you’ve watched the TV CSI lab technicians match the tool marks in someone’s skull to potential murder weapons? Remember how they work out which particular type of tyre iron, knife or blunt instrument was used to kill someone by comparing the shapes left in the victim’s bone with marks the CSIs thwack or stab into a suitable test material?
In theory you can do something similar in archaeology too. An edged tool with a “ding”it it, like this one-
Edge damage on a small cleaver
will leave a characteristic mark in the wood that it is used on. Take my right-handed spoon knife. In the photo below, you should be able to see the facets where I have used it to cut little chips away from a piece of birch; and inside the facets, thin, parallel lines which are left by the (currently damaged) knife edge.
Evidence for tool edge damage
Wouldn’t it be amazing to match up marks on prehistoric wood with the tools that were used to do the carving? For example, some 9000 pieces of wood were recorded from the Area 6A excavations of the Bronze Age timber platform and trackway at Flag Fen (Peterborough, UK) (Taylor 2001:171). Linking tools with timber at Flag Fen could throw light on ways that a major building enterprise was carried out and organised more than 3000 years ago. In theory, the very chisel used to cut a mortise joint could be identified, and we could say “this tool was used to do that job”; just like the antler picks excavated from Stonehenge which were used to dig out the ditch and the holes for the standing stones.
In practice, it’s not so simple. First, you need tools in order to study their edges. Despite all that wood, the Flag Fen excavations revealed no more than one socketed gouge and one socketed axe-head (Coombs 2001:263, 265). Why after all would anyone leave their tools behind? Perhaps as part of a ritual, or accidental loss; but not if they are still needed for other activities.
In fact, many of what could be described as Bronze Age carpentry tools – especially axes – have been found in circumstances other than archaeological excavation; they were ploughed up by farmers or found by metal-detectorists, for example, with no associated timber to try to match to. In any event, that timber will only be preserved if the underground conditions are right, like in the waterlogged peat at Flag Fen. And archaeologically excavated examples of Bronze Age metalwork finds often show, by the careful positioning and arrangement of the objects, that the tools had been put in the ground in carefully deliberated ways (Barber 2003); in what archaeologists call hoards, and not necessarily associated with the timbers that tools might have been used on, nor abandoned in the workplace.
This raises an interesting question: were all Bronze Age carpentry tools intended for woodworking? Metal – copper alloys and iron anyway, if not the precious metals – is often seen as “inherently utilitarian” (Barber 2001:164). Yet sometimes there is evidence that tools had not been used. For example, some of the axes from the Manton Copse 2 hoard found in Wiltshire in 1999 (and now in Wiltshire Museum) still bear their casting scars. Were they “poorly finished” as described in the excavation report (Lawson et al 2011:35), or unfinished because they were never intended to be fettled and sharpened for carpentry?
Secondly, you need to be able to identify edge damage. This could be difficult if the metal is corroded following thousands of years buried under the ground. Or the object could have been damaged after it was buried, for example if hit by a plough share. Some imperfections, which could leave very characteristic marks, are nevertheless very difficult to see on the edge itself – like on my spoon knife, whose faults cannot be seen with the naked eye but are very obvious in the wood.
Thirdly, edge damage is easy to remove, and it is usually in the interest of the carpenter to re-sharpen and re-shape the edge. Marks left in the wood might never be traceable to a tool which has been re-worked in this way. There used to be a wonderful example of the reductive effects of sharpening on display in the Museum of St Albans, when the Salaman Collection was exhibited. In the cabinet of sharpening equipment, a new chisel about 25cm long was shown alongside another of same make and original size, but which had been used and sharpened so much it is now only 10cm long. The evidence would also disappear if the tool was recycled – melted down and turned into a new object.
That’s not to say that the study of prehistoric toolmarks is wishful thinking. For example, 168 different axes were counted on the basis of the toolmarks left on the Flag Fen timbers. Comparison of the toolmark shapes with the dimensions of different types of British Bronze Age axe led Maisie Taylor to conclude that socketed axes had been used to do the wood-working at the site (Taylor 2001:194-202). More recently, photogrammetric and GIS techniques have been applied to the analysis of toolmarks on hewn prehistoric timber (Kovacs and Hanke 2012, 2013).
And finally…what might we conclude from the description of the Flag Fen scoop, carved from a piece of willow; “The bowl of the scoop was shaped across the grain and so well finished that no clues survive as to the method of fabrication.” (Taylor 2001:226)?
Barber, M. (2001) “A time and a place for Bronze” In Brück, J. (ed) Bronze Age Landscapes, Tradition and Transformation Oxford: Oxbow Books
Barber, M. (2003) Bronze and the Bronze Age Stroud: Tempus
Coombs, D. (2001) “Metalwork” In Pryor, F. (et al) The Flag Fen Basin: Archaeology and Environment of a Fenland Landscape Swindon: English Heritage
Kovács, K. and Hanke, K. (2012) “Hydrologic and feature-based surface analysis for tool mark investigation on archaeological finds” International Archives of the Photogrammetry, Remote Sensing and Spatial Information Sciences Volume XXXIX-B5:565-570
Kovács, K. and Hanke, K. (2013) “Automatic tool mark identification and comparison with known Bronze Age hand tool replicas” ISPRS Annals of the Photogrammetry, Remote Sensing and Spatial Information Sciences Volume II-5/W1:181-186
Lawson, A.J., Robinson, P. and Swanton, G. (2011) “Bronze Age metalwork from Manton Copse, Preshute, Wiltshire” Wiltshire Studies 104:31-43
Sainsbury, J. (1984) Sharpening and Care of Woodworking Tools and Equipment Burgess Hill: Guild of Master Craftsmen Publications Ltd
Taylor, M. (2001) “The Wood” In Pryor, F. (et al) The Flag Fen Basin: Archaeology and Environment of a Fenland Landscape Swindon: English Heritage
Bowland prehistoric landscapes project blog
researching 18th and 19th century things, mostly funerary
the history of 'the unruly sort of clowns' and other early modern peculiarities
Public Archaeology and Heritage
archaeology, illustration and comics
Medievalist, Book Historian, Broadcaster. Lost in the Fifteenth Century.
Campaigning for Diversity & Accessibility for Everyone in Archaeology
Rob Hedge
By two textile nerds
Studying the Destruction of Bronze Age Metalwork
Public Engagement with Archaeological Themes & Practices
Follow the research of an Archaeology Phd student over the next four years: The things he discovers, the places it brings and the people he meets along the way. (Site spelling variations; Arceofox archeofox archeryfox)
Archive of projects, events and news from 2012 to May 2017
Celebrating best of Wiltshire's creative talent
Leverhulme Funded Project at University of Exeter: Adopting a New Methodological Approach to Early Modern Women's Work
The archives held at the Institute of Archaeology, University of Oxford.
News on the best uses of Heritage for social and organisational change
Resource hub for archaeologists with an interest in experimentation
Getting, but then using them
Life, the River, and Beyond
thinking about archaeology
Adventures in Time and Place
the contemporary archaeology of prehistory
The adventures of an Early Medieval re-enactor
A light-hearted look at the 'Dark Ages'
Materialität, Realität und Konfliktivität in Museologie, Archäologie und anderen dinglichen Wissenschaften / Materiality, reality and conflictivity in museology, archaeology and other material sciences
Archaeology, rural life and the lessons of history
Investigating the Profession and Research
Museum of Archaeology & Anthropology, University of Cambridge
Tracing the spectacular within the humdrum of the built environment
populating the mesolithic | stones tell stories | resonating places
n. 1. The act or process of explaining about death 2. Something that explains about death 3. A mutual clarification of misunderstandings about death; a reconciliation.
Experimental Studies of Ancient Pottery
Exploring Time Travel of Place
Current news and archive for the Experimental Archaeology Conference
Historian of Science, Medicine, and Aesthetics
