Waiting, waiting…

It’s five month since I last posted, and yet I have so much to write about!  My working patterns changed in October 2016; I’m now part time with my employer having started a PhD project with the universities of Reading and Southampton. More about that later, but suffice to day I’ve been in the library much more than the workshop.

Plans.  A post about carving oak with flint blades prompted by a meeting with archaeologists to discuss a remarkable late-Mesolith/early-Neolithic Welsh artefact.  A post about flint.  A post about sarsen. More posts about sarsen. A post about straw plait. A post about frustration with a fabulous but tantalisingly distant museum collection. Hopes for more woody Must Farm replication.  And more.

I hope you will bear with me as I creakingly get myself into gear, to spend more time here sharing photos, experiences, and thoughts.

The Death and Birth of a Cannibal Fork

Sometimes my firewood delivery includes some wood that I prefer not to burn.  A few months ago the last load included some spalted something: I’m really not sure what tree this was from, it’s so spectacularly eaten.  Here’s a bit of a slightly less munched log:

A piece of spalted wood

I ought to burn it if only to reduce the number of grubs and beetles that might still be lurking in it, waiting to make their way to better-quality material in reserve for carving. Or my workshop roof.

These logs were on the way out.  Full of big holes eaten away by burrowing creatures, patches of soft fibrous white rot, and crumbly brown rot.  But spalting can be beautiful, making swirling lines and patterns, and contrasting colours.  The interleaving, revealing, maze of vacant tunnels lead into and out of the wood, little squints into its heart.

Some of this dying wood would be just right for an elderly, crotchety, worn out cannibal fork that’s come to the end of its life almost before it’s started.  It’s a poor old thing.


What’s in the box?

My second carving of the recently-excavated Bronze Age Must Farm wooden box, found along with other remarkable archaeological remains in a collapsed roundhouse in the Fens, has left me with more questions.  That’s what fact-finding is for.

As you can see from the photos, it’s a lovely little box, small and delicate.  Vicky Herring’s fabulous drawings show more details, including the suggestion of an interior seat for a lid.  But no lid was found with the surviving parts of the box.

Maybe it had a lid but at the time of the round house fire and collapse this had been taken off and left somewhere else.  Maybe the lid fell away in the collapse and will be found in lower deposits.  Maybe it burnt up in the fire.

So should I carve a lid?  The only evidence is negative evidence – the seat inside the box, which itself is partial.  Not much to go on.

Well, what use is a box without a lid?  Especially a small box like this that ought to have little treasures tucked away in it.

This slideshow requires JavaScript.

First thoughts

The wood is so green – the tree was cut down just a few weeks ago – that the sap was coming out of fibres as I cut them.  The lid is very thin, especially as I cut out a recessed panel like those in the long sides and base of the excavated box.  The surface area is therefore large in comparison to the volume of wood; this means that the very green wood can dry out really fast.  And even faster, because I brought the box and lid into my warm house.  So already the lid has shrunk.  It’s not such a good fit as when I first made it just 24 hours ago.

There are two choices.  Make the box from green wood or from seasoned wood. Each has advantages and disadvantages.  I can’t wait to find out more about the wood that the Bronze Age box is made of.  Hopefully the post-excavation analysis will reveal the species of tree.

OLYMPUS DIGITAL CAMERA

Box of tricks

This afternoon I completed my second fact-finding version of the fabulous Must Farm Bronze Age box. The first attempt involved making an approximation of the box excavated at Must Farm to show me some of the general problems I would be likely to encounter.  The second was more about all the little devils in the detail.

OLYMPUS DIGITAL CAMERA

Must Farm box #2

The first task was to study the fabulous artefact drawings and note the box’s measurements.  The box was found in pieces and one end is very poorly preserved.  This means that whilst the width and depth measurements are fairly reliable, the length is not.  The finer details, like wall thickness, are variable.  That’s probably for more than one reason, including the different parts that have survived and the way the waterlogged wood has changed shape over time, as well as the original dimensions as carved.

Having settled on the dimensions that I would carve to, this is what I cut:

Version 2 is closer to the original, in terms of shape and size, than version 1, and I have included an internal lip as suggested by the drawings.  This might have been the seat for a lid, although no lid was found with the box.  Like the first, this second version is willow.

First thoughts

The willow again was problematic: whilst its fresh, green, state made it really easy to cut, the open fibrous nature of this wood makes it difficult to get a good clean finish in the small, confined spaces of the box. To make progress I’ve got to the stage where I need to know the original wood species – and will have to wait for the post-excavation analysis.

In dealing with some of the torn and hairy wood fibres I have over-cut in various places, so that the dimensions aren’t quite perfect.  In trying to make the interior of the long side walls close to vertical, I have over-cut the depth of the interior by a couple millimetres.  This has left the base rather thin, whilst the two short end walls are too thick at the base and slightly over-cut at the top.

On the flip side, I have to make assumptions about the dimensions to cope with the missing parts.  The lid seat is a good example of this.  There isn’t much information in the drawings about it, I have made decisions about the shape and size, so the spots that I am unhappy about are only where I have failed to meet my own instructions – not necessarily what the box really looked like.

I have cut the lid seat around the whole of my box.  A lid for my version 2 would therefore have to press down onto the top of the box, engaging with all four sides.  One short end of the Bronze Age box, however, is (mostly) missing, so I can’t actually tell if this is how it looked originally.  It might have been open at the missing end, so that a lid could slide onto the seat – like a wooden pencil or domino box.

That interpretation is less likely, because there the original doesn’t seem to have channels cut in the long sides for a lid to slide along.

OLYMPUS DIGITAL CAMERA

Probably not like this…

Hence my interpretation of a seat to house a lid engaging vertically with the box.

Box of delights

Have you seen the amazing archaeology being excavated at Must Farm by the Cambridge Archaeological Unit?  Must Farm is one of the most important Bronze Age sites in Europe, because of the spectacular preservation.  The remains that survive are wonderfully intact, including things that we’ve never seen before.

This includes, for example, the roofing timbers of the settlement’s roundhouses; whole pottery bowls with their contents; a fleet of log boats; animal tracks and footprints in the mud around the settlement. Check out the photos from the past few months’ of digging – there’s even the most complete Bronze Age wheel!

Amongst the staggering preservation of organic remains, one of the many lovely things is a small wooden box, SF2747.  The Must Farm team has already shared Vicky Herring’s scale drawing of this find and I’m planning to make some facsmiles and replicas.  This weekend I made a preliminary rough-out to discover what problems I might encounter.  I picked up some fairly straight grained willow on Saturday that had only just been felled, so it’s really green and good to cut with edged tools.  This is how I got on:

This slideshow requires JavaScript.

We don’t yet know what species the box is carved from, but it’s a hollow form; meaning it was carved from one piece of wood, not made from panels jointed together.   My rough-out is approximately the right size and is carved from a billet cut from the same portion of branch as the Bronze Age box.  Its base and two long sides have recessed panels like the original, although their depth and shape need adjustment.

Inside, I have carved roughly the right shape but didn’t cut a groove to seat a lid. The original seems to have a groove for a lid to fit into, but no lid was found with the box and I’d like some more information before working on this.

First thoughts

The internal dimensions are challenging to carve.  The box is about 37mm wide inside and 29mm deep, making for a very narrow, shallow space to get tools and fingers into.  Working with very green wood is a great help, but the thin sides and base are at greater risk of splitting as the wood dries out. And the dimensions will change as the wood dries, that’s something to compensate for.

The drawing suggests that the corners in the bottom of the box are rounded, concave, curves.  I achieved this using my spoon-knives.  It’s not clear to me whether this shape was original or the result of use, or of change over time in the waterlogged mud.  If original, then this suggests that the Bronze Age carver did not use a straight edge to cut right-angled corners into the box.

That’s an issue because there are many cutting tools from the Bronze Age with straight or flat edges, but very few that cut in the way that spoon-knives cut.  And although there are various types of gouge, the internal space of this box is tiny – hardly any space in which to turn the cutting edge of a tool to make these complex curves and so that the wood fibres are cut, not torn.  A closer examination of the original might throw some light on this.

The type of wood will make a difference to its cut-ability too.  The willow I bodged has an open, fibrous, texture making it tricky to get a good finish in that tiny inside.  Also, the fibres tend to pull out giving the outside a slightly hairy look where I haven’t finished it tidily.  The widest growth ring shown in the box drawing is about 5mm, and in the c47mm radius in the end-grain of the box there are 15 rings.  It looks like a diffuse-porous tree species (one in which the Spring-grown and Summer-grown vessels are of an even size across the growth ring).  It will be interesting to see just from where in the tree the specialist analysing the box thinks the wood was taken.

More potato knapping

Having shared my attempt to knap a potato, @beccyscottuk explained that she cuts “flakes” from a King Edward to demonstrate the Levallois technique of flint knapping.

I had a go and it looked like this https://youtu.be/Oz_mApuzB-4

Or if you prefer not to watch stop-motion video on Youtube, like this:

This slideshow requires JavaScript.

For a real demonstration of Levallois knapping, check out Metin Erin’s Youtube videos 1, 2 and 3.

Potato knapping

I can’t quite believe I’m going to try this.

knapping tools and potatoes

But apparently you can knap a King Edward.

The awesome Beccy Scott at the British Museum, who is part of the Ice Age Island team, is known for replacing a flint nodule with a potato to demonstrate how knapping works. The potato is safer than sharp, shattery, flint bits flying all over the place.  That means it’s good for a demonstration, and for people to try out, when you haven’t got safety goggles to go around.

So I had a go.

knapping a potato

That’s a big, chunky, potato flake!

Not quite what I expected, but I might not be doing it right. This is what happened when I tried to reduce (=knap bits off) that first removal (=flake).

knapping a potato

I even managed to take a bit off with an antler hammer.

knapping a potato

But it was mostly crushy and squashy rather than flakey.  I’d love to see Beccy’s Levallois demonstration.

Demonstrating ancient technology and ways of life, getting across archaeologists’ interpretations of prehistory, communicating modern understandings of the past, are all really important.  Whether it’s explaining why the digging methods and behaviours broadcast in Channel 5’s execrable “World War II: Battlefield Recovery” are terrible; or helping Primary School teachers (who themselves dropped history aged 13) to teach the Stone Age to their 7 year-old pupils; or persuading politicians that cutting the already-minuscule budgets for museums and archives is a false economy.  Misunderstandings about the past, and about what archaeologists and curators do, are legion.

Take flint knapping. It’s not something for grunting cave-men dressed in animal skins, so stupid they can only bash rocks together.  It’s a skilled activity, the principal way that modern humans and their ancestors made stone tools for hundreds of thousands of years.  Without flint knapping, would we be around today?  But how can a UK Primary School teacher, who has never been taught archaeology, who doesn’t have the skills, and who might struggle to get hold of the raw materials, best convey this awesomeness to their pupils?  That’s why Schools Prehistory  is introducing potato knapping to teachers.

Take the appalling TV series currently on Channel 5, “World War II: Battlefield Recovery”. The programme makers seem to have ignored advice and decided it would be OK to show dangerous digging behaviour and inappropriate excavation of human remains (and all before the UK 9pm watershed). The dangerous behaviour includes using a mechanical digger to cut trenches in ground suspected to contain unexploded ordnance.  Is this really what people think archaeology is like? I hope not, given they’ve been able to watch Time Team for years, and the fabulous Meet The Ancestors which, in its Revisited format, is currently on BBC4. But still, “World War II: Battlefield Recovery” got made.

Take the dreadful threats to local museums and archaeology services – there’s news every month about different local authorities planning to slash, or even cut completely, budgets for museums and heritage services (like Lancashire and Norfolk and Shropshire right now).  There is ample evidence for the economic value of our museums, and for ways in which they promote our health and well-being.  It’s a false economy to slash archaeology services in planning departments: Britain needs a mix of regeneration and new development to deal with issues such as housing need.  But the Council for British Archaeology is now describing parts of the country as “black holes” where local planning authorities have little or no access to historic environment specialists who could enable this economic growth.

The Council for British Archaeology – of which I am a Trustee – says,

Spending on ‘combined heritage’ (including archives, heritage, museums and galleries, conservation and listed building planning policy, and archaeology) by local authorities amounts to less than half of one per cent of all local authority spending.
We need to keep on, dispelling misconceptions about archaeology (cave-men, any fool can dig a trench…) and heritage (an expensive luxury that can be cut without consequence…).  That’s my Grand Challenge for archaeology.


Getting ready to pot some pots

Thanks to the phenomenal Graham Taylor for great day spent at the Stonehenge Visitor Centre with some lovely people earlier this month!

I had a great time discussing prehistoric pottery, practicing pinching out round-bottomed bowls, trying to make Beaker shapes, and thinking about clay sources on and around Wiltshire’s chalk uplands.  Up here further north in the county, where there is more variety of clay, I can’t wait to go gathering.

It’s huge fun taking a bucket of clay, processing it, testing its qualities and working out what it’s good for.  I did this for three clays from Exeter and one from Charmouth a few years ago.  They were all different and really good clays, but the most awesome was the one from the coast at Charmouth.  It was dark green-grey, because it was full of organic material. Here’s a photo showing an un-fired test tile, a piece from a tile fired to 900C, and the remains of a tile fired to 1280C.

cropped Clay D comparison

At that higher temperature the Charmouth clay melted all over the stoneware waster that supported the test tile in the kiln! What a fabulous, green, glassy slip.  The clay was full of lime as well as organics, shown when I tested an un-fired tablet that bubbled up in an acid test in the lab’s fume cabinet.

So I’ve been making some tools that should help me to make and decorate prehistoric pots.  I’ll need to collect a few more bits and pieces together, but here’s the first batch.

This slideshow requires JavaScript.

EDIT: I fired the little carinated bowl that I potted with Graham but regret to report that it didn’t do too well. It’s cracked, because of temperature fluctuations during the firing that stimulated stresses and strains in the clay body (causing the cracks to grow). And it’s underfired, because the temperature wasn’t hot enough for long enough.

Getting the good stuff. Sarsen #7.

How do you go about getting stuff?  I mean good stuff, not any old stuff.  Good oil that won’t ruin your engine.  Good netting that won’t rot.  Good brushes whose hairs won’t fall out.  Good shoelaces that won’t snap.  Good valves that won’t leak.  Good washers that will hold.

Maybe you rely on brand names, recommendations, or reviews.  Or look for kite marks or British Standards.  Perhaps you just buy what you always buy.  If you have a choice of, say, apples, most likely you use your senses and experience to make a selection.  You know what rotten apples look, smell and feel like.

I have been thinking about procurement – getting stuff – because of the problems that I’ve had recently, with wood in particular.  How to go about finding good stuff, not just any old stuff.  And how archaeologists can think about how people found good stuff in the past, when the landscape, ecology, and natural resources familiar and available in prehistory are so different now.  Not only good stuff – what about just making do with what you have got?  So I went for a walk, to think about where the Burderop Down sarsen stone came from.

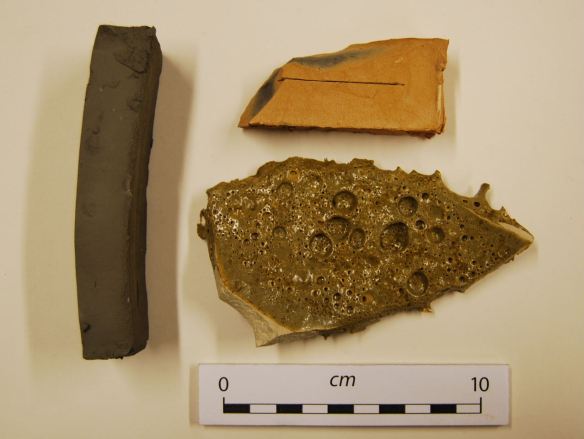
Here’s the archaeological background.  During the 1970s Chris Gingell (1980, 1992) carried out fieldwork across parts of the Marlborough Downs.  At Burderop Down, the excavations revealed spreads of sarsen stone which were interpreted as working floors; the waste left over from the production of saddle querns in the later Bronze Age.  Sarsen boulders cleared from the surrounding fields were gathered together and shaped, by knapping, to make the querns.  The querns, “so common on Wessex sites”, were then distributed around the countryside (Gingell 1980, 215).

Now a lot of sarsen was recovered during these excavations.  A lot.  Last time I added up the Wiltshire Museum catalogue entries I counted nearly 400 bags of sarsen pieces from the Burderop Down dig.  The site is located on the north-facing slope of the chalk scarp on the northern edge of the Marlborough Downs, just to the east of Barbury Castle.  It is about 6km away from the best known areas of sarsen stone to the south, on Fyield Down for example, but well within the general geological range within which the rocks are found.

What evidence is there now for sarsen stone on Burderop Down?  Where did the people making those querns get their rocks from?  Good, fine-grained sarsen stone that could be broken in controlled ways to make the characteristic shapes of saddle querns.  And other types of stone, like flint, to make pecking stones to prepare the quern surfaces for crushing cereal grains.

Having left the car in the Barbury Castle car-park, the walk starts back down the lane for 200m before turning off to the footpath heading east on the 260m contour line.  Almost immediately comes the first sign that there is sarsen in the area:

Richard Jeffries memorial stone

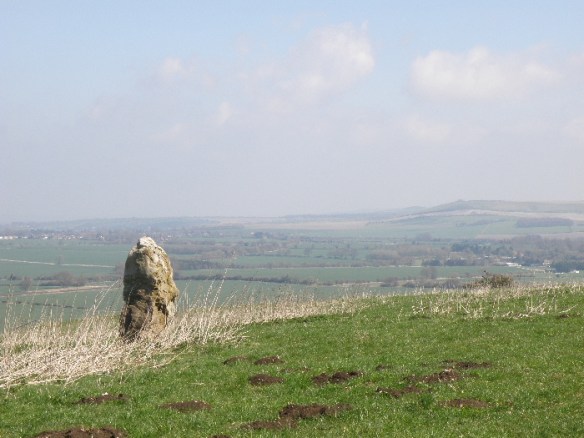
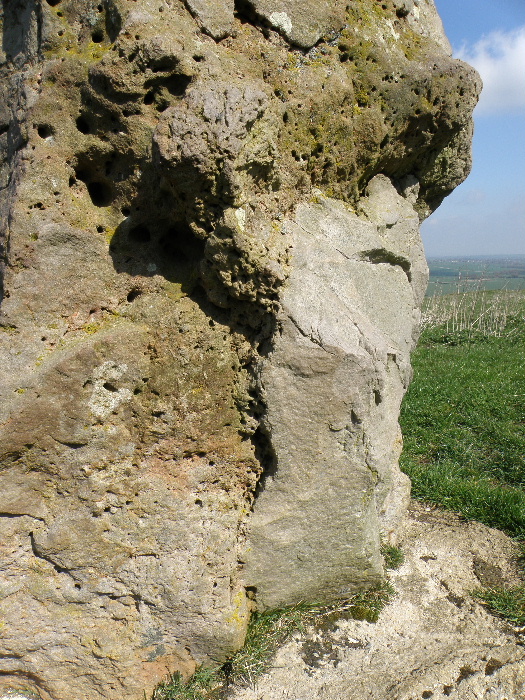
A standing stone, looking out over the valley towards Ashbury and White Horse Hill there on the horizon.  The megalith isn’t prehistoric, though.  It’s a memorial stone, commemorating local author Richard Jefferies and poet Alfred Williams.  The memorial is a great example of how variable sarsen stone can be.  In this one boulder there are areas of fine-grained saccaroid sarsen, rough areas full of fossilized root holes, and a range of colors, because of the variety in the Tertiary deposits that were cemented together to make the sarsen.

Jefferies memorial stone

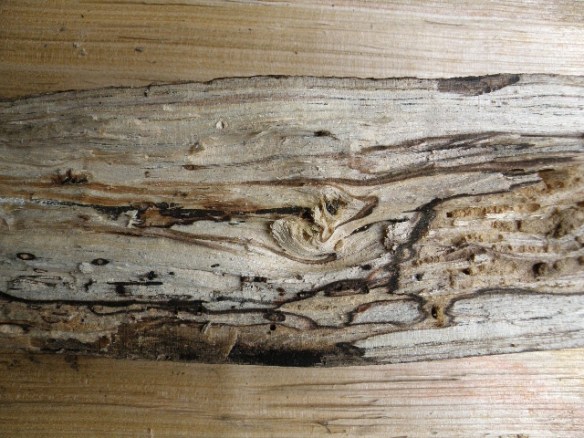
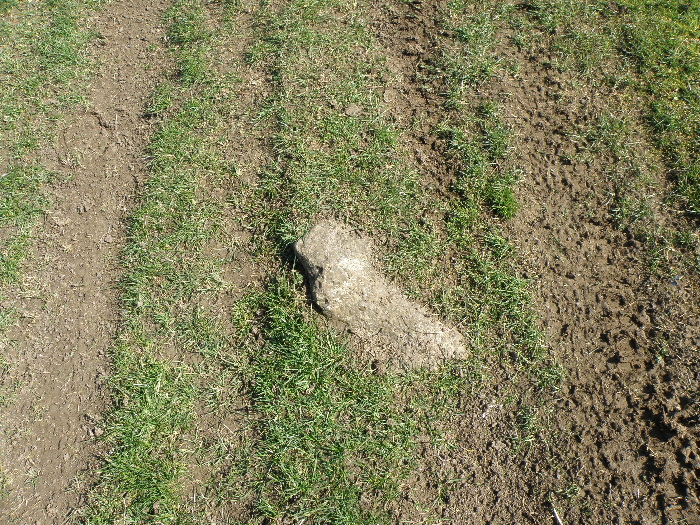
Walking along the footpath towards Burderop Down, there’s not much to suggest that there was ever much sarsen stone lying about here.  Here’s a piece in the track:

sarsen in the track

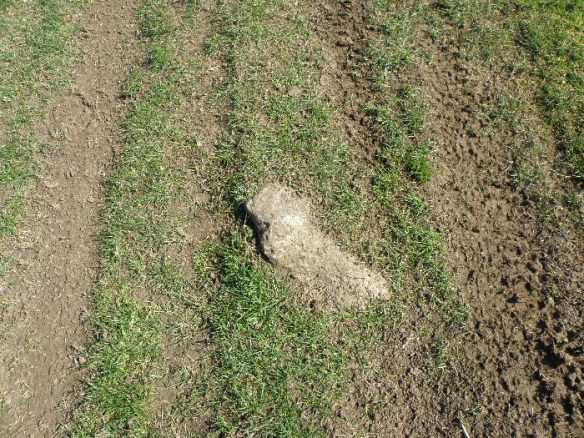
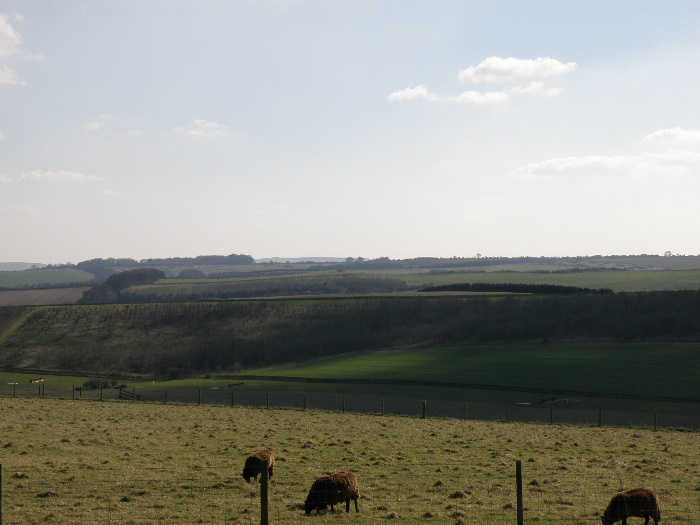
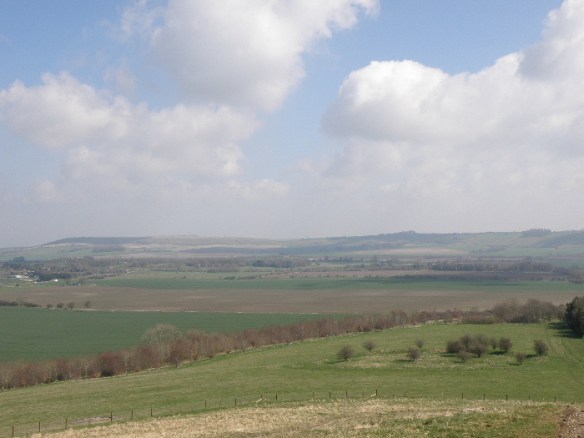
but there isn’t any more to be seen around.  And it’s only another 600m before we reach Chris Gingell’s sarsen working site, in the grassy area in the bottom right of the next photo.  That round earthwork, with those scrubby trees, is a large disc barrow first excavated by Passmore in the 1920s and again by Gingell in 1979.  Behind it is the sarsen quern manufactory.

Burderop Down disc barrow

I love the arguments between visitors, carried out in graffiti on the adjacent sign board, about what the disc barrow earthworks are thought be be:

This slideshow requires JavaScript.

Hardly any sign of sarsen at all, until you look closely at the upcast from the molehills that are dotted about:

There are scrappy fragments here and there.  Unlike villages south of Broad Hinton on the Winterborne, or Avebury, or the Kennet valley villages for example, there aren’t even any sarsen gateposts to keep up the morale of the dejected sarsen-seeker.  It might look beautiful, but it doesn’t look like there’s any sarsen left on Burderop Down.

Burderop Down panorama

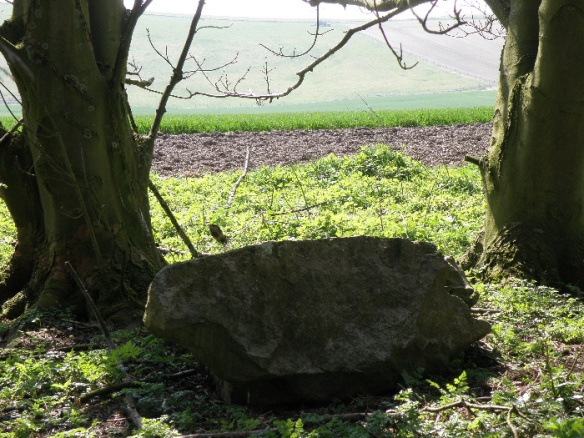
But just a couple of hundred metres east, and look, what’s that in the hedge line? A sarsen!  From here, following the footpath south-east, there are some stones – dragged out of the cultivated areas and left at the field edge.

sarsen stone

As well as the occasional sarsen – and I mean very occasional – there is plenty of other agricultural rubbish, broken up chalk hauled up by the plough, and flinty bits.  Sure, you get similar rubbish around the farms a few kilometres to the south, but there you also trip up over all the sarsen.  Here you have to hunt it out.

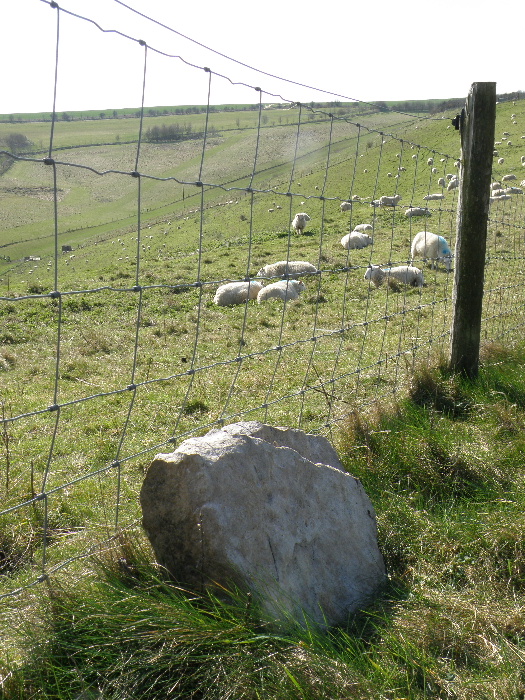
The path continues south-east over the Holywell chalk bedrock where, at a point just west of Ogboune St George, it meets the Smeathe’s Ridge bridleway.  Turning north-west, I headed back towards Barbury Castle in the afternoon sun.  One sarsen boulder buried in the footpath was the last piece I would see until I found a grey wether impersonating a lamb hunkering against the fence line.

sarsen stone

There are still vast quantities of sarsen only a few kilometres to the south, even though people have been taking that stone for 4,500 years.  Why isn’t there more lying about here around Burderop too?  Where did all the stone for the quern manufactory come from?  Has it all been used up, moved, and taken away?  And when did that happen?   It’s a fascinating topic.  Selecting raw materials for certain qualities, using the stone, leaving the remains.  Now, the hillsides look so different, cultivation that began in prehistory never stopped.

I failed to find the good stuff on this trip.  The experience tells me that different things happened to sarsen on this patch of the Marlborough Downs, only a few kilometres away from sarsen around villages like Fyfield, Lockeridge, Clatford, Manton.  It will be fun to tell those different stories.

Rockley Downs

Gingell, C. (1980) “The Marlborough Downs in the Bronze Age: the first results of current results.”  In Barrett, J. and Bradley, R. Settlement and Society in the British Later Bronze Age  Oxford: BAR British Series 83 (i).

Gingell, C. (1992) The Marlborough Downs: a later Bronze Age Landscape and its Origins. Devizes: Wiltshire Archaeological and Natural History Society Monograph I.

This is how Stonehenge used to look

When the huge sarsen standing stones were raised at Stonehenge around 2,500BC, they were pale and sparkly.  The natural, weathered, grey-brown surface had been knocked off many of the stones to create just the right shapes and surface effects.  Much of Stonehenge would have looked almost as white as the chalk dug out of the foundation pits for the stones to stand in.

dressed sarsen stone

Two years ago I spent a day out in north Wiltshire, filming with a team from October Films.  We spent most of the time amongst recumbent stones talking sarsen, but I also did a little bit of stone dressing for them (on a piece of waste sarsen on a local farm, collected up with lumps of hardcore, disused fencing, empty feed containers and other agricultural detritus).

The team used the footage in episode two of Stonehenge Empire (google it, mixed reviews but with some good bits plus much coverage of the awesome Hidden Landscapes project).  (And you can see me dressing a piece of sarsen in this cool English Heritage video, “People Moving Stones“.)

Two years on, and the dressed patches are gleaming.  The rain has washed away all the loose grains.  Lichens have yet to colonise the broken surface of the dressed stone.  Two and a half thousand years ago, sarsen stones at Stonehenge gleamed like this.

How long did it take for the weather to bring back the grey-brown, for the lichen to grow?   Two years is too soon.   Twenty?   Two hundred?  The fascinating report on the analysis of a laser scan carried out at Stonehenge in 2011 makes great reading.  Even after 2,500 years, it was possible to record and interpret the dressed surfaces on sarsens and  bluestones.  Some effects of dressing and shaping have lasted all this time.  But not the colours.

I wonder what stories about Stonehenge were passed down the generations.  The monument we know today has had an extraordinarily long prehistoric life.  How long was it before the gleaming whiteness of the sarsens was forgotten, or the journeys of the bluestones, or what it was like to make the Avenue?  When the axe carvings were made on the sarsens, Stonehenge was almost 1,000 years old.  Had the sarsen weathered back by then, did the little Bronze Age axe head shapes stand out all white from the surrounding grey-brown?

Given that two years is no-way long enough, an archaeological experiment to investigate changing colours at Stonehenge from a phenomenological perspective is probably not on the cards.  More’s the pity.  But take it from me – that’s how Stonehenge used to look, for a while, anyway.