I’ve been working on two facsimile tools for the Education Team’s object handling collection at the new English Heritage Stonehenge Visitor Centre.
Amongst a whole range of replica and facsimile artefacts, the Team needs a hammerstone; a copy of one of the tools interpreted as hammers or mauls used to shape the stones at Stonehenge. This copy will be handled by visiting school classes so that they can get a feel for the archaeological examples that will be on display. I’m making two (different size and weight so the Team can chose which to use with different-aged children).
The hammerstones are almost exclusively made of quartzite sarsen – nodules of this hard material that have been beaten and bashed until they break up or, less commonly, become rounded and smoothed through attrition. It takes hours and hours of use for a quartzite sarsen nodule to reach this state.
Perhaps this is a good time to define “replica” and “facsimile” artefact.
The words mean different things to different people, but I choose the following definitions:
Replica – an object made with the techniques, tools and materials known or thought to have been used at the time of the original exemplar.
Facsimile – an object made using modern (or a mix of modern and historical) techniques, tools and materials to create something that looks like the original exemplar.
I am making facsimiles, rather than replicas, because I am using some modern techniques and tools in the process. This is necessary because of the long time that it would take to do the job just by working a piece of saccaroid sarsen with the nodules – I would be unlikely to meet my deadline!
The process involves removing some of each quartzite sarsen nodule with an iron mason’s pick and punch to remove the more angular parts and some of the “case-hardened” cortex, before using the newly-broken surfaces to work a piece of saccaroid sarsen in the prehistoric manner. This action then ‘finishes’ the surface of the hammerstone.

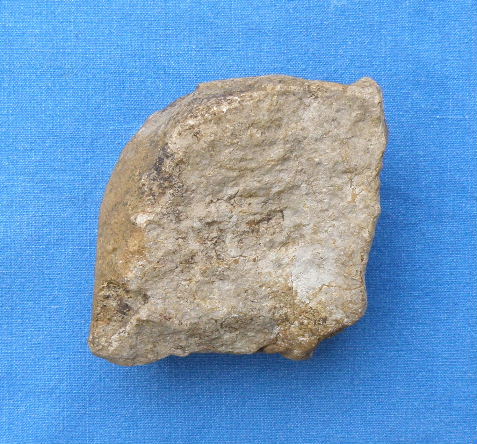
Small quartzite sarsen nodule, 2013
The first nodule was a small piece of yellow-brown quartzite sarsen that appears to have been broken from a larger piece. It had cortex on one side and showed its grey interior colour on the broken side. It weighed 536g. The second nodule was darker in colour, also showing its grey interior where it had been broken in the past. It weighed 2149g.

Large quartzite sarsen nodule, 2013
Both were collected from a farm on the Marlborough Downs. They were taken from modern clearance piles of waste stones and other farm rubbish such as old concrete fence posts. This was to ensure that they weren’t taken from one of the designated or protected areas of the farm, or from an archaeological context.
I shall post photos of the finished objects when they are done.